> ## Documentation Index
> Fetch the complete documentation index at: https://docs.gladecore.com/llms.txt
> Use this file to discover all available pages before exploring further.
# Step 2: Setting up New NPCs
> This section covers how to setup/use NPCs for open world NPC games or UI-based games.
### **Select your NPC Setup**
The first option and section below is for creating [**UI only NPCs**](#ui-only-npcs) that don't need a full NPC character in a world. If you want to create an NPC that exists physically in the game world, select the [**Open World NPC section**](#open-world-npcs).
### UI Only NPCs
For help reference the two demo scenes named `DemoChat` and `DemoChatMobile` inside `Assets → GladeCore → Scenes`. We also provide the prefabs inside `Assets → GladeCore → DemoAssets → LLM` if you do not want to create it from scratch. Below are the steps to create UI only NPCs:
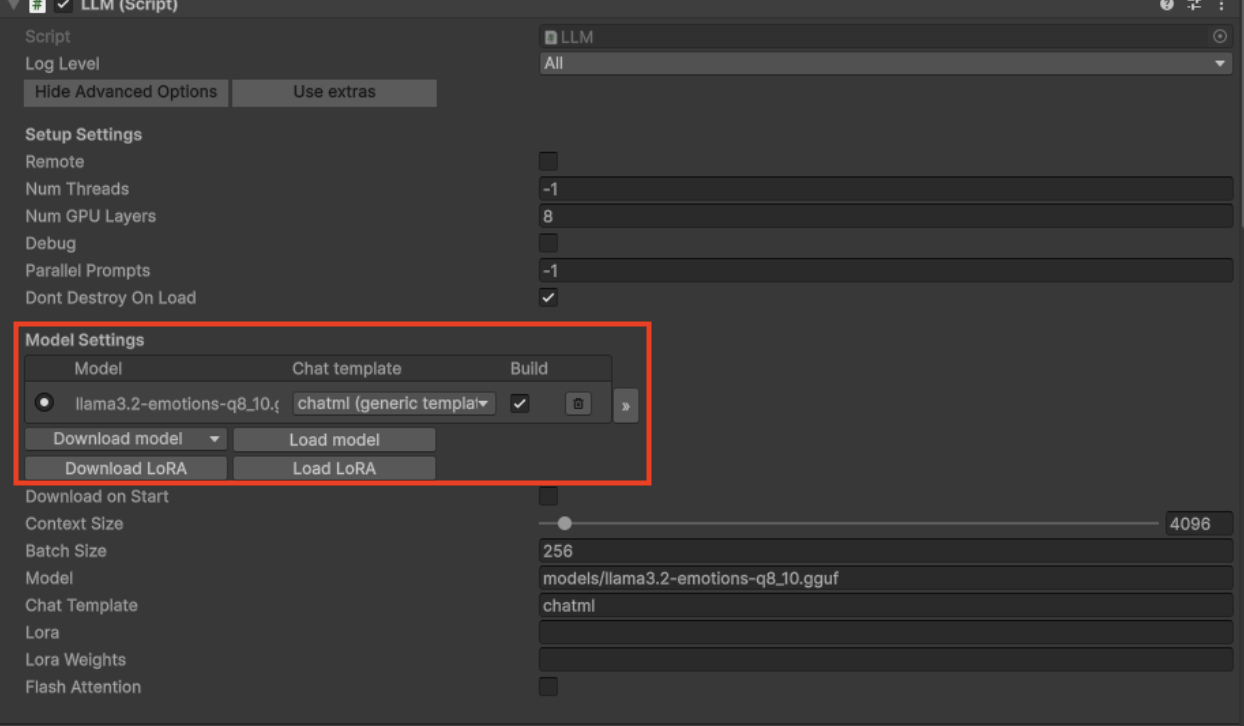
1. Add the LLM prefab or create an empty GameObject and add the scripts named `LLMServiceManager`, `LLMUnitySafeShutdown`, and `ChatHistoryLoader`. Then load the model in the LLM section like we did in the previous step. The LLM prefab needs a model applied in this script section or the inference won't work.
 Make sure your scene hierarchy looks the same as the one below with all your characters in the scene.
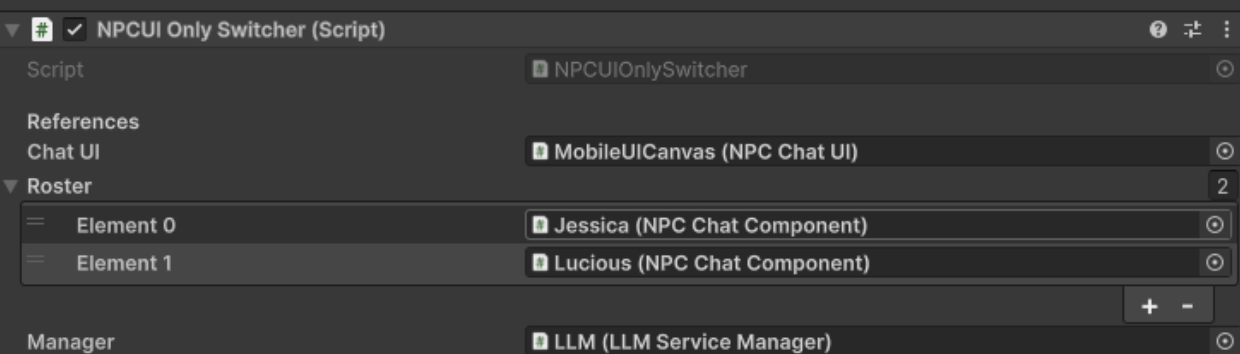
 2. Add the `NPCSwitcher` Prefab to the scene or add an empty GameObject and add the script `NPCUIOnlySwitcher`. In the NPC Switcher make sure the below values are assigned. Once all filled out, your NPCs should be all set to use within the scene. The following "Using the NPCs" section will cover how to swap NPCs in scene and reset context.
 3. Add your **Canvas** by using one of the prefabs inside `Assets → GladeCore → DemoAssets → UI` (Use the non demo UI canvas so there is no demo wording). The **Canvas** is where you can edit everything from bubble sizing to panels and more. You are able to customize your own panel if you would like by swapping out the assets just to make sure that they have the corresponding fields with a content and scrollbox so that it works the same. You can also change the bubble prefabs and swap them out for buttons, different looking bubbles, or whatever you desire as it can be implemented to your needs.
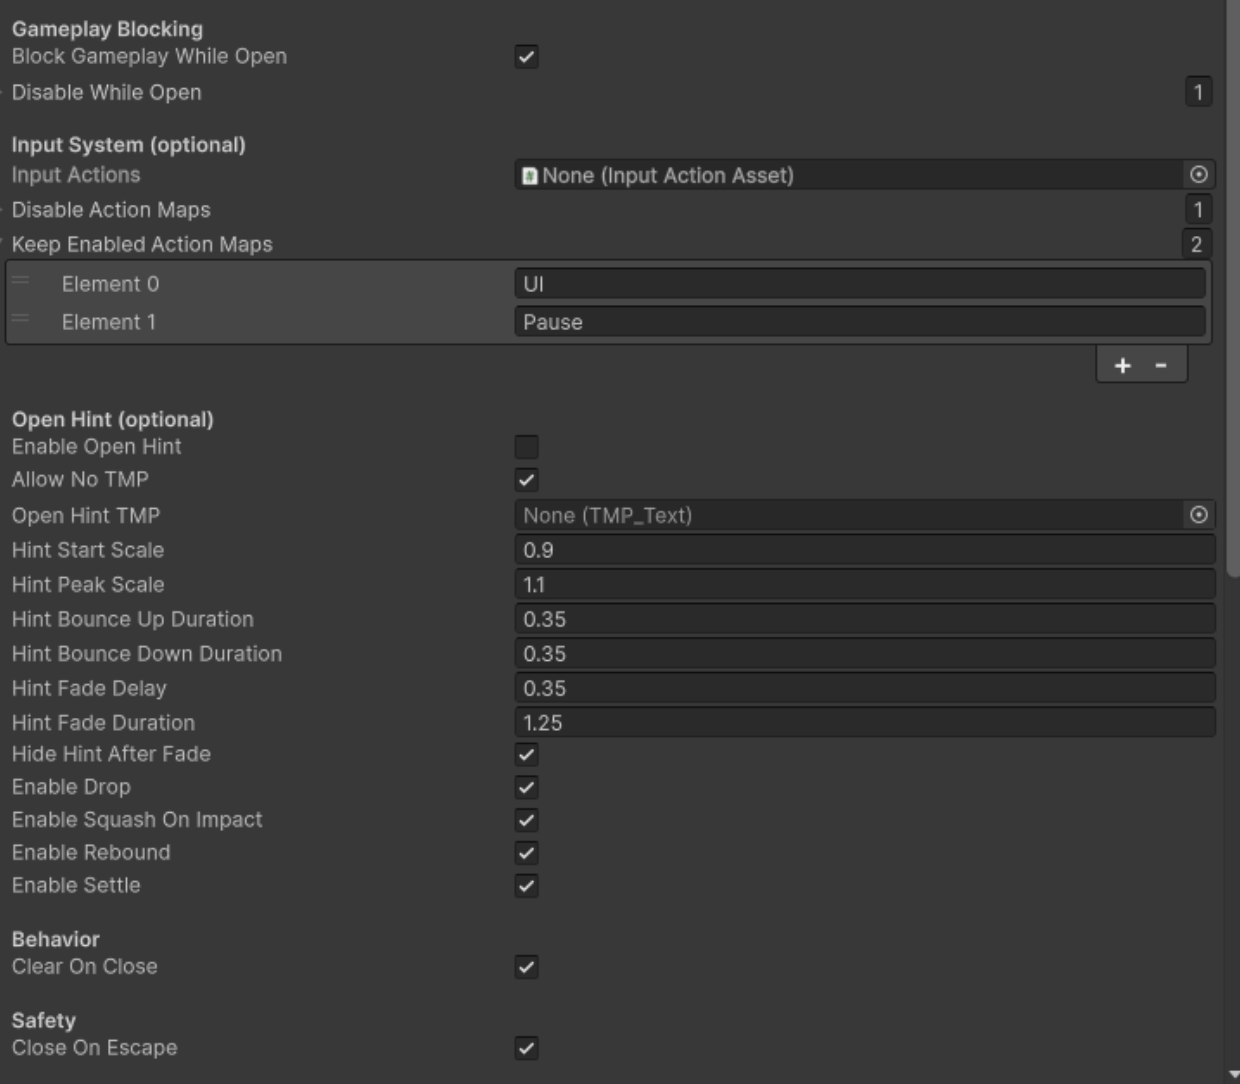
 2. Look through the canvas and make sure each thing aligns with your gameplay needs. Most will not need to be changed as it has most end cases covered and is mostly cosmetic. If you do not want a close button do not assign the button and uncheck the close on escape otherwise assign the button and it will work on click or escape button. The `Enable Open Hint` field is for the "Start Chatting" that appears when opening and closing. Leave it blank for UIs that do not open and close so it does not get in the way. Make sure to enable/disable action mappings that you do not want to happen when the UI is enabled (movement or other UI systems) using `Keep Enabled Action Maps` and `Disable Action Maps`.
 If you are only making UI Only NPCs, skip the following Open World NPC section by clicking [here](/unity/step3).
### Open World NPCs
For help reference the demo scene named DemoNPCs inside `Assets → GladeCore → Scenes`. We provide the prefabs inside `Assets → GladeCore → DemoAssets → LLM` as well if you do not want to create it from scratch.
1. Add the LLM prefab or create an empty GameObject and add the scripts named `LLMServiceManager`, `LLMUnitySafeShutdown`, and `ChatHistoryLoader`. Then Load the model in the LLM section like we did in the previous step. The LLM prefab needs a model applied in this script section or the inference won't work.
If you want persistent context saved across multiple games, enable persistence and DO NOT CHANGE the Streaming subfolder from saves and location unless you change every reference in code and this is something you specifically want/need to do. Persistence needs to be enabled if you want to close the chat and come back to a chat with any NPC in the world. If it is disabled it will start a new conversation when you close and come back.
2. Add your Canvas by using one of the prefabs inside `Assets → GladeCore → DemoAssets → UI` (the Demo UI has instructions on the screen). The **Canvas** is where you can edit everything from bubble sizing to panels and more. You are able to customize your own panel if you would like by swapping out the assets just to make sure that they have the corresponding fields with a content and scrollbox so that it works the same. You can also change the bubble prefabs and swap them out for buttons, different looking bubbles, or whatever you desire as it can be implemented to your needs.
Look through the canvas and make sure each thing aligns with your gameplay needs. Most will not need to be changed as it has most end cases covered and is mostly cosmetic. If you do not want a close button do not assign the button and uncheck the close on escape otherwise assign the button and it will work on click or escape button. The `Enable Open Hint` field is for the "Start Chatting" that appears when opening and closing. Leave it blank for UIs that do not open and close so it does not get in the way. Make sure to enable/disable action mappings that you do not want to happen when the UI is enabled (movement or other UI systems) using `Keep Enabled Action Maps` and `Disable Action Maps`.
3. Add your player prefab to the scene and attach the script `PlayerNPCInteractor` so that the player can interact with an NPC based on a radius or trigger box. In the NPC Switcher make sure that these values are assigned.
If you are only making UI Only NPCs, skip the following Open World NPC section by clicking [here](/unity/step3).
### Open World NPCs
For help reference the demo scene named DemoNPCs inside `Assets → GladeCore → Scenes`. We provide the prefabs inside `Assets → GladeCore → DemoAssets → LLM` as well if you do not want to create it from scratch.
1. Add the LLM prefab or create an empty GameObject and add the scripts named `LLMServiceManager`, `LLMUnitySafeShutdown`, and `ChatHistoryLoader`. Then Load the model in the LLM section like we did in the previous step. The LLM prefab needs a model applied in this script section or the inference won't work.
If you want persistent context saved across multiple games, enable persistence and DO NOT CHANGE the Streaming subfolder from saves and location unless you change every reference in code and this is something you specifically want/need to do. Persistence needs to be enabled if you want to close the chat and come back to a chat with any NPC in the world. If it is disabled it will start a new conversation when you close and come back.
2. Add your Canvas by using one of the prefabs inside `Assets → GladeCore → DemoAssets → UI` (the Demo UI has instructions on the screen). The **Canvas** is where you can edit everything from bubble sizing to panels and more. You are able to customize your own panel if you would like by swapping out the assets just to make sure that they have the corresponding fields with a content and scrollbox so that it works the same. You can also change the bubble prefabs and swap them out for buttons, different looking bubbles, or whatever you desire as it can be implemented to your needs.
Look through the canvas and make sure each thing aligns with your gameplay needs. Most will not need to be changed as it has most end cases covered and is mostly cosmetic. If you do not want a close button do not assign the button and uncheck the close on escape otherwise assign the button and it will work on click or escape button. The `Enable Open Hint` field is for the "Start Chatting" that appears when opening and closing. Leave it blank for UIs that do not open and close so it does not get in the way. Make sure to enable/disable action mappings that you do not want to happen when the UI is enabled (movement or other UI systems) using `Keep Enabled Action Maps` and `Disable Action Maps`.
3. Add your player prefab to the scene and attach the script `PlayerNPCInteractor` so that the player can interact with an NPC based on a radius or trigger box. In the NPC Switcher make sure that these values are assigned.
 Now your NPCs should be all set to use within the scene. Look at next [Using the NPCs section](/unity/step3) to understand how to use the NPCs further. (*We will update to allow new input system soon*)